
Making and Inoculating Sawdust Blocks
Making and Inoculating Sawdust Blocks
**Video Below
Sawdust blocks are the most common way to grow mushrooms indoors, in limited space. They’re what the kits are made of and can be sized to fit on a table top. However, not just any wood will do. Fungi, like humans, have food preferences. Sawdust from hardwoods is the best, with oak topping the preferred list along with sugar maple. Ash, alder, and jack pine won’t work; neither will most other soft woods such as conifers. Pellets that are easy to dissolve in water can be obtained from a number of reputable sellers.
If you know a woodworker you might be able to obtain chips or sawdust that way. You’ll also want untreated wood since many chemical preservatives and other treatments will kill your fungi. Avoid brassicas and blueberries in your mix. You’ll need a source of wheat bran; a bit pricey in the grocery store but this can also be obtained from feed stores.
Helpful tips:
I’ve found the pellets dissolve very easily while I’m mixing, but gloves are a nice thing to use. The mix is a bit acidic and just plain messy, so use a good-sized pot for mixing. I mix 4 cups of pellets, 1 cup of bran, and about 35 ounces of water in an 8 quart stock pot.
Wood Preferences
Here’s a nice chart showing the wood preference of a number of commonly grown mushrooms:
![]()
Supplies and Equipment
- Autoclavable mushroom bags
- Pressure canner (not to be confused with a pressure cooker)
- Wood pellets
- Wheat bran
- Measuring cups
- Mixing pan
- Gloves
Recipe
Generally, I use 1 cup of pellets to 1/4 cup of wheat bran. The exact recipe will depend on the size of your bags. My recipe:
- 4 cups of oak pellets
- 1 cup wheat bran
- 35 ounces of water
I use an 8 qt pot for mixing because I’ve found the process to be a bit messy. Gloves are nice because the mix is a bit acidic. So measure your ingredients and mix well. The pellets I use dissolve pretty easily. You want a fairly smooth consistency with the wheat bran well mixed in. Load the bags, fold them over, and sterilize them at 15 PSI for 2-1/2 hours.
Helpful Tips
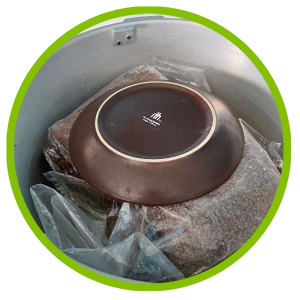
Bags in Canner
Very important: put a heavy plate on top of the bags in your canner. If you don’t the plastic can expand and block the pressure release valve. This is very bad! Fill up the canner with water about halfway up the bags. The extra water is necessary because of the amount of time needed to fully sterilize the block. It’s better if the bags aren’t in direct contact with the bottom of the canner, so they don’t burn. I use canning rings for this.
I make my bags as needed and leave them in the canner until I’m ready to inoculate them. This helps avoid contamination by not opening the bag or the sterile environment prematurely. Since the heat and pressure needed to kill contaminants will also kill your mycelia, it’s best to leave the bags in the canner overnight so everything cools down in a sterile environment.
Inoculation of Blocks
This is usually done from grain spawn. A fully colonized quart jar of spawn can inoculate several blocks. It’s also fine to inoculate your blocks heavily, for example 1/3 jar per block or more. This will help them colonize faster, which is of course the quickest way to mushrooms. It’s also helpful for the mycelia to become the dominant organism in the block, well able to outcompete any potential contaminants.
Supplies and Equipment
- Still air box
- Grain spawn
- Alcohol wipes
- Bleach solution
- Rubber bands or big twist ties
- Can opener (optional, depends on the lids)
- Knife
- Paper towels
Unless you have a clean room in your house, I can’t recommend the still air box enough. This box creates a sterile space to work within and while it’s a bit of a pain, it’s far more painful to toss weeks worth of work and supplies to contamination. Trust me on this one.
Procedure
Sanitize the inside of your box with the bleach solution; walls, top, bottom, every single inch. I find that a spray bottle and paper towels work well. Sanitize everything including the jars, lids, knife, rubber band/twist tie and place inside the box along with the sawdust block. Close up the box and spritz some of the bleach solution into the hole at the top, then replace the rubber seal. This disinfects the air inside.
Put your hands inside the gloves. Open up the spawn jar and the bag. Use the can opener if you’ve used a metal lid that sealed. Use the knife to loosen up the culture in the jar.
Shake the culture as desired into the bag, then fold the bag up so that the air filter is on top. Rubber bands work great for holding the folded bag closed. If you’re using twist ties, then be sure to twist the bag closed as tightly as you can and close above the air filter. Be sure to close the spawn jar if you’re planning to inoculate another bag from it, before opening the box!
You can now remove the inoculated bag from the still air box and label with mushroom variety and date. Giving it a shake isn’t a bad idea but don’t shake hard enough to break the bag.
Helpful tips:
Given the size of my still air box, I find it’s easier to inoculate one bag at a time. My canner will fit three bags so I make three blocks per session.
- Definitely repeat the sanitization procedures between blocks, each and every time! Giving the outside of the sterilized block a wipe isn’t a bad idea but I’ve found it not totally necessary either, since the bags are still warm from the canner.
- Place the inoculated bags out of direct light, in a darker space and place them so they don’t touch. The growing mycelia will respire and produce heat, which forms condensation on the inside of the bag. This is a good thing.
- Be sure that the filter is folded such that there’s air flow into and out of the bag. Fungi are obligate aerobes, which means they need to breathe as much as we do. An anaerobic environment produces organisms we’d rather not have.
- Sealing the bags with heat from a curling iron, as I do for Mylar, didn’t work for me. You can try if you’d like. I think the plastic is just too thick for that.